If you are a dreamer, a doer, a horizon viewer - come in! come in! Announce yourself and let it be known.
The seed of adventure has been sown.

The goal is to take this boat on a trip that no other Wharram boat has taken.
From Great Slave Lake in Canada's Northwest Territories up the MacKenzie River to the Beafort Sea
and westward to the Bering Sea and south to the inside passage on the Alaska and British Columbia coast.

Thursday, October 30, 2008


The last two days have been all about fairing, glassing and filleting the inside of the hull. It turned cold so after I completed glassing the interior, I covered up the top with scrap lumber and put a heater inside to help the epoxy curing process along. I've filled the ends of the hull with scraps of foam from building the ama and then tied it all together with expansion foam. I like the fact that so many parts of this boat are scraps from my Tiki 26 build. I kept almost all the cut offs of plywood and timber from that build so I have a good deal of material mincluding glassing tools, epoxy, cloth and the likes. Tomorrow I hope to get started on installing the watertight bulkheads at each end and the mast support web at station 5

Wednesday, October 29, 2008

Light work day today, faired the remaining part of the inside of the hull and foamed the bow and stern..........................

Tuesday, October 28, 2008


I got up at five as I was thinking about what to do next. After my morning cup of kickstart I figured hell start work'in! So I cut glass for the ends of the hulls in the bouyancy chambers and glassed these in (before breakfast) After taking my daughter to school and ran back down the hill and got on with cutting bulkheads from my templates. These I stuck in and glued scrap rigid foam to. I'm planing on glassing the hull athwartships so I faired the middled fifty inch section. I have meetings all mid-day and a couple of functions tonight so with a little luck I'll squeeze in a couple of hours between these commitments to glass the mid-section and fillet the two bulkheads, I've made. Having been down this paqth before I'm on a quick beam-reach with my bag of tricks in hand.

Monday, October 27, 2008


Today was the big day, popping the hull off the molds. I was up early 5am to draft up the shapes for the stands to hold the hull. I built them right after I dropped off my daughter off at school. Then I pulled and pried and tussled with the hull until suddenly it released from the molds. Instead of being a heavy, difficult thing to move about the hull with glass on the outside was super light. 20 pounds on the bath scale. Very cool. The weather on the other hand has been totally cooperating, sunny and tee-shirt only required. It should stay that way for a few more days.
I spent the whole day there after cleaning out the garage, ridding the inside of the hull of glue bubbles and fairing as much as I could with a surf form and a sander. I cut some temporary gunnels and set it up in the garage I made the bulkheads for the ends then did the midline fillet. It feels good though I'm worried my scantlings are on the light side. One thing I'm going to do different is that I plan to fill the ends with foam from stn 0 to 2 and from 16 to 18. This will make the end storage compartments smaller but that is perfectly ok with me as I see them being mainly for bouyancy.

Labels:

Sunday, October 26, 2008


The outside is now completely covered in glass. It took three days to get it all done. Though it has been unseasonably warn and non-rainy, it's still been on the cold side for doing epoxy work even withfast epoxy and some heat on. Tomorrow I'll build some work stands and then try to pop the hull off the molds so I can begin on the inside.

Wednesday, October 22, 2008


Using a pencil to draw squiggles in all the divots, I refined what areas needed to be filled. by resanding the whole side (this is from after I dropped the boat)doing some remarking and shining a light along the hull AND looking for areas that still had a sheen from glue or from the original thickness planner run, it was possible to see where else I needed to fill. Tomorrow I'll sand this side once more with the sanding board and then if all looks good I'll lay down the outside glass on this one side. If it's not ready, I'll hit if with more home-cooked filler. It's way easier with the boat in this on its side position to do these steps!

Labels:


Staples pulled and the worst of the glue foam dribbles and hard edges taken off with a surf form, I hit the hull with the hand power planer set at very shallow. Long even strokes got things looking better followed with the random orbital and then the 3 foot sanding board. Other than for the divots this is starting to look good!

Labels:


Fun and games pulling staples is! They came out of the bamboo and particle board molds pretty easily though there were a few hide and seekers hidden among the glue dribbles that showed up when I took the surf form to the hull. I like this way of building - It's fun.

Labels:

I was sanding the fairing compound I had smeared on the hull last night and dropped the hull. Damn now there would be damage to fix! The saw horse legs I have been using snapped the attachment points to the strongback causing the hull to fall away from me and land on my chop saw and the corner of a 2x4. I expected it to be bad. In the end all that happened seems to be one seem split about 4 inches and the 2x4 dented. Bamboo is hard stuff even when it's less than 3/16 thick. Fortuitously the hull is now on its side raised on other saw horses so I'm working one side at a time.

Labels:

Tuesday, October 21, 2008


Yesterday I finished strip planking the main hull of the Ulua I'm building. I ended up using 109 7' bamboo splits to do this. It went well even though the bamboo tends to have twist in it. For the most part I used these to my advantage. Now come the onerous task of pulling close to 2500 staples. I did a few last night and it went pretty fast. Completing the staple pull will be this morning's task then on to scraping off the excess glue and then I'll get on with fairing the hull. If it works, I'll have built a hull for much less than it would have cost using cedar. If I'd ordered pre-made cedar strips from Noah's in Toronto the materials before shipping and tax would have been $464. In bamboo it cost me $98. Weight wise the bare hull should be pretty similar. One advantage of the bamboo is it is super hard compared to cedar not to mention it's grass not vanishing old growth forest. I'm excited to see what the hull will look like once it is sanded smooth.

Labels:

Saturday, October 18, 2008


Hull flyby

It was a day for breaking tools. The minor one was my staple gun. The major onr waqs the thickness planer. The motor that drives the feed rollers siezed. It broke the drive cog in the process. I disconnected the motor and now have to push material through. A total drag. I wasted a great geal of time though I spent the day outdoors - sunny - working and did lay up some planks.

Thursday, October 16, 2008


Today I set the remaining molds to the strongback played around with the final squaring of the molds and purchased 200 splits of bamboo to strip plank the hull. These I got for 90 cents a piece. I figure I'll need 120 or so to do the hull. I planed them as well as I could to 3/16 and did a test staple onto the molds. I've set the stem frame and have the material ready for the stern frame. That will be layed up later tonight. Tomorrow if all goes right I'll start planking the hull. I also got two 18 foot lengths of bamboo for mast and boom. This boat seems to be building itself.

Wednesday, October 15, 2008

Seattle has settled into its long descent into winter. Quickly disappearing daylight with a large side dish of rain soaked leaves clogging the storm drains. A good time for day dreaming. I am staying busy with a new work contract that gives me a fair income and time to plan next summer's adventure and do a boatbuilding project. The daydream is about trucking Tsunamichaser to Great Slave Lake for 2 months of exploration. The lake is nearly 450 km long with endless island to explore. The plan is the first step in taking my Tiki 26 north as I by line at the top of this blog. I have charts, have been reading sailing directions and a text about Samuel Hearne who explored the region in the 18th century. Great Slave Lake which is in Canada's Northwest Territories is the host to the region's largest city - Yellowknife with a population of 18,000 but this metropolis lies in the north arm far from the east arm that is host to a miriade of islands and an amazing intersection of Canadian shield and low lying uplands. It is also the deapest lake at 612 plus meters. ....I daydream as the rain pelts down outside....

Meanwhile I am building a Gary Dierking outrigger. It is going well and fast. I have completed to glassing ready the ama, iakos, and leeboard. This week I have lofted the molds and set up the strongback so far. Tomorrow, I will complete attaching the molds to the strongback and hopefully pick up the bamboo 1/4" x 1" x 6' slats I plan to use to plank the hull.


Labels:

Wednesday, October 08, 2008

I have uploaded 1155 photos from my Tiki 26 build. Lots of details that I had'nt posted before. I took photos every day but only posted the ones I liked best. These will give lots of build details and the order of the build, though the picures are mixed up in certain cases
Tsunamichaser 1


Tsunamichaser 2


Tsunamichaser 3


Tsunamichaser 4


Tsunamichaser 5

Monday, October 06, 2008

I finally got around to uploading photos from the launch of Aluna, Beat and Beatrix's Tiki 38. I've been busy. Kiki Johnston, who helped rig for the launch got me going on Gary Dierking's outrigger canoe "Ulua" so I got the book out of my local library and have started building. More on that later. I've been thinking about it for awhile anyway - a sailing outrigger as a lightweight get there without the outboard kind of craft. By the way, I'm bilding out of scrap from my Tiki build and hope to do the strip planking in Bamboo 1/4"x3/4".
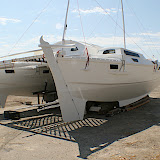
Aluna Launch September 2008
  • CLICK HERE TO SHUFFLE MY PHOTOS

    Spot Track

  • Track Tsunamichaser
  • Spot Track
    Click link above the Spot to see where Tsunamichaser is.