If you are a dreamer, a doer, a horizon viewer - come in! come in! Announce yourself and let it be known.
The seed of adventure has been sown.

The goal is to take this boat on a trip that no other Wharram boat has taken.
From Great Slave Lake in Canada's Northwest Territories up the MacKenzie River to the Beafort Sea
and westward to the Bering Sea and south to the inside passage on the Alaska and British Columbia coast.

Thursday, November 30, 2006


I am nearing day fifty of building in the shed. Sixty-six days ago I entered the shed. I think of this building in days not hours as the plans give - 700 hours to build one of these beauties. Days are more informative of progress to me. Actually I should'nt be counting at all, but my curiosity got me and the idea of having to start this once again. How long will it take the second time? ----------

I should go skiing, wait for the cold to pass and hit it again. In my morning post I thought it was going to be in the fifties - dream on! What wishful thinking, the temperature maxed out at 39.4 F. They say it will be in the mid-forties next week - they say, who is they, we'll see. Meanwhile I dream of building on a warm beach where I could run down to the water for a swim or if the swell was up a surf. Cold-cold-cold, you are get'in me down. I should abandon you boat for a session in the pow-pow. That would help but would I return before melt out in spring. Dream of that warm stretch of sand somewhere south of here. My viking blood must be thinning. The rice and beans and fish I eat must fortify. I can tolerate it but the epoxy will not cure. Yes I have those cold cold no good epoxy blues!


This is where I want to be building! A black sand beach in the warm air of a Pacific breeze
For a moment there I got impatient. I forgot to remember slow-time, maƱana! There I was last night thinking I'd be installing cabin tops and decks sometime soon. Like next week. As I stood in the shed this morning, wearing a silly hat and a pair of flipflops (the temperature has doubled and we are back to mid-fifties), I started howling at myself with laughter. What was I thinking? I have all that gluing, filleting, taping and finishing of the upper hullsides before I can finish the inside for shelving, paint and buoyancy foam and that doesn't even consider the need for dryfitting deck beams and stringers. ...........Oh and if you are building one of these, don't forget the multitude of hullside doubling plates for shrouds, deckbeams etc like I almost did.

Wednesday, November 29, 2006


Another day too cold for epoxy in the shed! I braved the 20 something Fahrenheit temperatures to do more carpentry without donning gloves. My hands will toughen up this way. Other than a butt block for the new panel scarf and wiring the bulkheaads to the panel, I am now ready to glue up both upper hull sides. If this weather continues I will switch to working on the beams. Atleast with them, I can build a small insulated box that I can heat so that work may progress through the cold spell.

Tuesday, November 28, 2006

In the end I couldn't stay out of the shed despite freezing temperatures. There were carpentry tasks that I could do so by mid-afternoon I found myself setting up the table saw to mill out temporary external stringers. I moved the thirty foot long half round I'd made from the shed to the garage for sanding. I set up my jig and drilled holes in the bulkheads and then snaked the half round into the respective holes along the length of the hull. Despite the lights in the work shop, it was getting too dark to see all the details so I donned my headlamp. At this time of year it gets dark early at this latitude. I finished up the days work by landing the half round on the bow and stern and screwing it in place. Keeping in mind the great clean up I had done yesterday, I spent a few more minutes sweeping up before closing up for the day. Now as I type, I am noticing the tingling in my finger tips, despite the tin work gloves I was wearing, as they warm up.

I woke up to snow and ice everywhere. 23 degrees Fahrenheit. School is closed. So I play games with my kid. It is too cold to do epoxy work. This "Arctic Blast" is to last several days.

Monday, November 27, 2006


I spent the morning waiting for the temperature to rise enough that I might be able to do some epoxy work. No such luck. To delay work, I first did a long post, then I went grocery shopping. By the time I got home it was snowing. Snowing! I should be out skiing. If the cold weather continues I will do just that. Since I couldn't make progress on the boat, I decided to do other related tasks. I made a new shelf for the shed. I deep cleaned the shed and reorganized everything. I cleaned out the garage where I do my sawing and layout. Still snowing still cold. I drank numerous cups of tea, coffee and hot chocolate today to make the day go by. Finally I just had to do something on the boat so I glued up the joining block for the added upper hull section. There is always tomorrow.

The adjacent picture is a better shot of the distance between the butt joints on the upper and lower panels that I posted about this morning. If you look for the screws, spaced at 25 cm, you can see that the butt joints are now offset about 100 cm. This makes me feel much better.


I was mixing up a batch of epoxy glue to join the upper hull panel to the lowers when I looked up - it was snowing. A quick check of both the shed and my indoor/outdoor thermometers showed that it was 5 degrees above freezing. What was going on? Suddenly I had a new concern, if this snow stuck around could the shed roof handle the snow load? Despite bizarre weather with high humidity and cool temperatures, I continue building. I stewed over the long weekend about how the upper panels were landing on the completed hull. The first issue was that the upper panels could have been 1/4 inch wider as in 12.25 inches instead of 12 and would line up better with the bulkheads and cabin sides. The reason for this is a result of the difficulty in getting the bulkheads all the way to the bottom of the lower hull panels when you first push then into the wired together hull. My advice - insert a pencil between the wire and the keel when you stitch the hull together at the keel to lower panels joint. This way you will get enough slack in the wires to properly open them up. I could have "corrected this problem at the top of the bulkheads by not overlapping the upper to lower sides by a full inch but this is an important joint. The inch is a minimum I feel. The second issue was way more critical to me. The longitudinal panel joints where landing too close together, separated by only a couple of inches. To fix this meant undoing several days work, figuring out how to modify the upper panels to shift the lower and upper joints apart (see before and after photos in this post) and then making it happen. As I had already drilled holes for the screws and I wanted to reuse these, I had to figure out how much to shift the upper panel so the screw holes lined up (luckily I'd laid them out on regular centers at 25 cm), the backing blocks didn't land at the bulkheads and that I could add a new section from the scrap I had on hand. The measurement turned out to be 1012mm. I drew the line and then stewed some more. I was about to live with it BUT it's a boat, "keep in mind what it has to endure when it is in a big seaway or worse touches bottom as you sail in shallow waters - think of the stress." In hadn't fully removed the panel. All I had done was roll the boat on its side (no small feat) on sawhorses, undone the necessary screws at the bow, raised the upper panel away from the lower with an inserted two by four and marked the cut line. I checked my measurements once more, stewed some more and plugged my panel saw in. What a load of work I was creating for my self! I still wasn't ready to make the cut - I could just forget it, it wouldn't be an issue but my conscious kept at me. I went inside for another look at the plans, Wharram doesn't offset the panels much, maybe a foot I said to myself - an inch a foot what's the difference. I checked Sam Devlin's book, Devlin's Boatbuilding - he didn't have much to say on offsetting panels but what I kept hearing was a conversation I'd had many years ago with John Lockwood of Pygmy Kayaks about offsetting panels for strength of the joint. If the panels line up the joint can "zipper" open. Spread the strain. It makes total sense afterall, that is what you do in any shear panel. Stew, stew and stew! Then I thought about old time boatbuilders who supplied the local village with their boat needs. That kind of boatbuilder stayed in business by the success of the product. If the boats didn't return from there voyages then maybe the mariners in that village would seek out a boat elsewhere. In the modern world of commercial boatbuilding this effect is somewhat lost. There is little connection between the users and the producers - it creates a "can't see it from my house" environment. Back to the shed. I picked up the panel saw pressed down the trigger and ten seconds later was feeling much better.
With the bow a little short now, I removed the rest of the screws, moved the panel forward, aligned it, set some nails on the one inch line to get the upper panel to sit right and proceeded to refasten it. I switched from a SS #8 x 3/4" screw to a SS #8 by 1" and worked my way along. At the stern I made a kraft paper template of the piece I needed leaving the old angled stern as it was. After making the template I found a suitable piece of scrap, cut out a new piece and suitable backing block and screwed these to the hull. I wired the top edge to the bulkheads and inner sheer clamp (mis-named earlier as deck clamp), put a temporary 1 x 2 on the outside to get the curve right and stood the whole thing back on its keel. After all the stewing about having to go backwards days of work, the correction took no more than two or three hours. The lesson learned, again!, if the work you've just done doesn't sit right with you, do it again until it's right. You won't worry about it failing when you are in a tough spot bouncing around in the slop.

Saturday, November 25, 2006

I received a comment to yesterday's post, about running an interior stringer at the deck to upper hull side joint instead of the exterior one per plan, from Dave in Oz that I think is worth posting about. That is posting instead of responding in the comments section.

Before venturing down the road of building a Wharram Tiki 26, I spent a fair amount of time researching these boats and the construction method. My goal, other than dreaming of fast passages and sailing right up onto calm isolated beaches, was to understand the good and the bad. I looked at other cats and I worked on my own designs. As I don't have much experience with sailing cats, I thought I'd build a modest sized boat and test it out before venturing onwards. The inner stringer, which I believe is called the deck clamp, is in this case meant to serve as a way to land the upper edge of the hull side and the outer edge of the deck/cabin side. In my readings and from an understanding of how glass cloth likes to lay it seemed better to me to add the outer stringer to the boat after the exterior glass had been added. If you go back a couple of posts you'll see that I round off this edge so the glass can make this bend. My research showed that other builders have experienced leaks at this point because there is no over lap of the glass normally. The hull glass comes up to the stringer and the deck glass goes down over the stringer following its profile. The deck -hull joint is one that can experience significant stress particularity in Wharrams where the hulls hang off of the beams that land on the deck and are lashed to the stringer. My goal here is not to change the design but to strengthen this joint. Hopefully my approach will do so. One thing about the way that I am putting the pieces together is that it moves away from Wharram's certain and simple way of building into a more complex one. This is something I am keeping in mind - I don't want to make things unnecessarily complex.

Friday, November 24, 2006


The upper hull panel looks good from the inside when installed.


After a solid day of eating and watching the snow pack grow, I returned to the shed to attempt the first install of the landing stringer and a hull topside. Thoughts of skiing were of first order but I don't trust new snow over no base with a holiday crowd a yahoos urgently needing to rip up the slope. All in good time, no need to end the season short with an injury or worse. Not that I am a cautious tele-skier. I've just watch too many fools bite it in their first few days. Hey experience is worth something sometimes!

Thoughts back to work on the boat, I first drilled a hole in a scrap of 6mm plywood to see how close to the edge I could go with the one inch hole required for the stringer. I held it about 2mm from the edge. I drilled the holes at each bulkhead and after having faired the thirty foot long stringer fed it into place through he six bulkheads. Easier said than done but I eased it slowly into place with all the bulkheads holding and none of the holes blowing out. Once it was in place I tapped a short length of half round stock into the one side of the round hole with the flat side of the stringer at a 45 degree angle to the tangent of the hull side. Once in place I rolled the boat on its side on two saw horses, fitted the bow end of the stringer, screwed it in place and then lay the upper hull side strip along the one inch overlap line I'd previously drawn on the lower hull side. Once I had it properly lined up at the bow, I temporarily clamped it in place and then measured and marked screw hole locations. These I drilled with a tapered bit with a countersink attached. I use a Fuller countersink bit. I did these in groups of five, starting at the bow to ensure I didn't cause edge set. I continued with this until I reached bulkhead #1 at the stern. Here I stopped leaving the stern end of the stringer and hull side free. I resuspended the boat in the straps, removed the saw horses and lowered the boat back onto its cradle up[right. At this point a drilled a hole through the bulkhead near the top and two through the sides so that I could wire the bulkheads to the side. After completing this, I noticed that I had bent one of the bulkheads out of its vertical plane. I checked all the bulkheads with a straight edge, adjusted two and retightened the wires. After completing this, I noticed that the stringer needed to be further rotated. I drove the short half plugs out of their holes and rotated the stringer until it was right. In one place, I discovered I had inset it too far leaving a hard bend to its length. After re-driving the bulkhead plugs and by using clamps and a temporary exterior stringer I determined that I could get the upper edge of the hull side to lie in a fair and true curve though bulkhead #4 appears to have been cut too narrow at the top. This can be adjusted by loosening the wire slightly and allowing it not to lie tight against the hullside. I decided to call it quits for the day. With so many distractions around I decided not to go on as it would be easy to make a critical mistake at this point.

Tuesday, November 21, 2006


Any promise of pre-thanksgiving skiing washed away with the last storm's rising temperature. Instead of snow, the slopes were pummeled with heavy rain. A good thing for boatbuilding as it is allowing me to refocus on building instead of figuring out how to sneak away for a day or two of turns at the local hills. Now missing skiing is NOT a good thing but not being able to focus on the boat is BAD! After yesterday's all day sanding extravaganza I'm back to making bits and pieces and gluing stuff together. I'm ready to install upper hull panels and did manage to dry fit one yesterday after I posted. It fits though it is about 1 cm short. I also went ahead and did a top coat of clear resin on the bulkhead to hull glass woven cloth tape in the cabin area. I discovered a few rough spots and actually cut myself on some non-bedded biaxial tape in the hold area so I added resin there too. I've been doing this by turning the boat on its side and taping off the area with blue masking tape to do the coating. This makes for a nice smooth and run/sag free application with a clean straight edge but it means I only get one side done at a time. I did one side late last night and the other first thing this morning. I am also gluing up the long batten I plan to use as the inner stringer (departing from Wharram's plans). This stringer will be integrated into an interior fillet where the hull meets the deck or cabin side per the attached drawing.

Monday, November 20, 2006

No photos today - too dusty. I sanded for seven hours straight. I sanded the entire outside of the boat, the inside including the storage areas to rid them of any rough spots from drips or missed glass protrusions. I also sanded the upper hull sides in preparation for their installation. One cool thing I did was weigh the hull in its current state including hull topsides. It came to 197 lbs. This week will be slow as I have relatives coming into town but I hope to make some progress on the upper hull sides.

Saturday, November 18, 2006


I made banana pancakes and coffee for my family this morning. After a good feed and talk, I headed out to the shed. Today I made happy shiny fillets. That is I coated yesterday's fillets with clear epoxy to make them nice and smooth. To do this I resuspended the hull in its straps and turned it until the fillets were horizontal then brushed on the epoxy. No drips or sags this way. I also "pre-pregged" 2" woven glass tape which I applied over the hull-bulkhead joints. When these have cured, I'll flip the boat and do the other side.

Friday, November 17, 2006


After a day of floating upside down, the hull is back in its cradle. No longer do I feel that the braces I had attached it with to the shed are required. With the bunks glued in, it has become torsionally very rigid. Before when I pushed on the hull near the bow the stern would remain fixed while the boat flexed along its length, now it moves as a single object. One of the interesting parts of this process is the building into the hull of significant stresses. The epoxy holds the plywood in its tortured shape. The plywood pushes back against this significant restraint. What started out as a pile of floppy plywood and liquid is slowly becoming a rigid object. When I look at it it is more sculpture and boat. The hull really feels like an outrigger canoe at this stage. You could cut the bulkheads off at the lower hull panel stringer, rig it up with an outrigger and ama and you would have an interesting boat. But this is no proa. It is a symmetrical catamarn with much work ahead. I now have spent 39 days working in the shed. I hope to finish the lower hull side fillets over the weekend so that I can start on the upper sides Monday - here I go setting goals again. I have more sanding to do to get the inside ready for paint. I have tried to work as clean as I can, avoiding drips, smoothing out epoxy fillets as I install them and then finishing them up whent they reach an almost cured state. There are still little drips that I miss or other rough spots. There is also fresh epoxy to be sanded everywhere you add a fillet or handle the boat with sticky gloves. Sanding is one of those activities that you could do forever if you wanted to never finish the project. How smooth is smooth enough? It requires carefull work as it is easy to sand through the epoxy coat which then needs to be fixed. I have a few places that I will need to repair. But I am encouraged by the progress I am making.

Thursday, November 16, 2006


Today was a perfect building day - blue sky puffy white cloulds! It is too much fun to have the boat hanging from straps around the shed rafters. Suddenly the boat moves, it has become a dynamic object.


Having tossed the daily workplan yesterday and feeling relieved and cavalier about it, I'm back to freestyle building. It is so much more rewarding to walk over to the shed (5 steps from the back door) toss aside the tarp covering the end of the shed and saying to myself "what shall I work on today?" Today as I entered the shed, I was inspired to flip the boat over. Partly this came about because by running my fingers along the underside of the bunks I could feel that the epoxy I'd used yesterday hadn't penetrated fully in all spots. I rigged up some raft tiedown straps, lifted the boat, yes to my delight and surprise I can still lift the hull by myself, clinched the straps tight and had the boat swinging in it's cradle in no time. By grabbing a gunnel/shear stringer I was able to roll the boat over. After flipping it all the way to see if the keel was straight and true, it is, I rolled it to a 45 degree angle and made up a batch of running wood flour epoxy. This I dumped into a plastic bag. After cutting off a corner, I proceeded to pour epoxy into the joint along the low edge. Perfect fillet with no messy clean up or trowelling. Once it has set up, I flip the boat the otherway and do the other side. I hope to be able to raise one end at a time to do the ends the same way.

Wednesday, November 15, 2006


Best plans are waylaid just by that - making plans. Up until this week, I just had a sequence of work to do not a timeline. For some reason, I mapped out a daily work plan. I won't do that again as I found myself trying to work quicker to keep up. Ugh! This morning I was confronted with uncured epoxy so no keeping up with the plan. I had to laugh at myself and throw the workplan out. I glued the wet well floor in and held it firmly against the sides not with wire ties but by clamping a strong back across the hull and then using pipe clamps backwards (only the sliding part) to push the floor sides firmly against the hull sides. By afternoon the uncured epoxy was cured enough to handle. I cleaned up the few drips and proceeded with gluing all the bunk boards in place. The end is in sight for the bunk boards. I'll add fillets to these tomorrow and the bulkhead fto hullside fillets Friday. With the upper sides glued up and the materials for my planned changes on hand, I ready to start upper sides soon.

Tuesday, November 14, 2006


Yesterday the bunkboards were bits and pieces. Today, I was able to dryfit all the bunks. Once I knew they worked as intended, I drilled all the fastener holes oversized, gave all the bare wood one last sanding and then a coating of clear epoxy. They will be ready for installation tomorrow with all bare wood now sealed. In anticipation of being able to move beyond the bunkboard level. I glued up the upper hull sides. I will let them cure undisturbed for a couple of days. If I am able to install the bunks and fillet them over the next couple of days I will be able to start installing hull uppers on Friday.


I have mentioned before that I considered buying/building both a Pahi 31 and a Tiki 26. The photograph in this post shows mid cross-sections of both boats, keels aligned that I lofted up on a basement wall. Although the Pahi is only 5 feet longer, its volume is significantly more. Much of this volume is in its additional head height. I chose the Tiki over the Pahi for very specific personal reasons though one day I may want to sail a Pahi and will venture down that waterline. Though the Tiki looks small compared to the Pahi in the drawing, in real life I am pleasantly pleased by its actual size.

Monday, November 13, 2006


Some days you just need to put it in production mode! I'm pining to move beyond the bunk level of the boat though I know that I have a great deal to do before I get there. To move it along and because I needed to make all the pieces for the underside of the bunk boards and hatches (my style), I did them all en masse. As long as everything is set up carefully, this is highly efficient. Not only did I manage to make all the parts, I laid them out, fitted them and glued it all up today. One problem though, not enough room to glue everything at once in the shed and shop as the shop is dusty from today's production so I crossed the line, I'm gluing in the basement. I hope this isn't the start of a trend like when you let a dog or cat that normally lives outside in on a particularly inclement day and before you know it they've made a permanent home of the couch! In the glue up photo the little nails are temporary. I don't have enough clamps to I temporarily tacked the hatch cleats.
I was just looking at the Tiki 26 for sale at http://www.yachthub.com/index.html?page=list/ed.html?de=17453. This is a really nice looking boat. Two things struck me in looking at the pictures. 1. I have a long way to go, a way long way! It is hard to visualize that what I am building will one day be similar to what I'm seeing in the photos. I am so focussed on the minutia of fillets, hatch cut outs and the like. 2. The other thing that struck me when I looked at the photos is how much the building process of a T26 is a from the inside to the outside process. It is almost as if there is no outside to this boat. For days now, I have focussed on finishing the inside while the outside sits almost forgotten, just bare wood.

Sunday, November 12, 2006


One thing that helps me build is drawing details of how I plan to assemble the parts. My understanding is that the deck to hull joint is prone to small amounts of leaking that lead to delamination of the glass and subsequent rot. The other issue is that that the upper to lower hull side panel joint can look unfinished. Here are some of my ideas about these two areas. These type of drawings are my "shop drawings" that help me figure out how to build the designer's plans. I like to do them well before I need to do the work so my brain can work out any issues while I think about other things.

I've been getting some great comments. I really appreciate the feedback and opportunity to discuss Wharram's boats with others. Don't be shy send me your thoughts on what I'm doing, questions you may have or ideas on how to go about the whole process. One question I keep getting is how did I arrive on the decision to build the T26. Below is the text from an email I got (made anonymous) and email reply I sent back with a little editing and completing.

> Hi Thomas,
>
> My name is D___ and I live in G________, WA>
> I just wanted to say thanks for making the effort to
> share your
> building experiences with the rest of the world.
>
> I am thinking about building a Tiki26 or 30 and am
> finding your blog
> very useful. I can't seem to find many Wharrams on
> the west coast of
> Australia. They seem to be over on the east coast or
> up in the
> northern part of Australia. So for the mean time I'm
> just looking at
> as many pics on the net to try and get a feel for
> sizing etc.
>
> I got the design book a couple of weeks ago and will
> probably get the
> tiki26 and tiki30 study plan soon. I'm pretty sure
> that one of these
> will be for me, it would be nice to actually see one
> first hand
> though!
>
> Well I better not keep you for long, you've got a
> boat to build!

My reply

It sounds like you are much in the same boat I was
when I was trying to decide! No Wharram's to look at locally.
I wrote to Wharram, who sent me a list
of folks who had built them on the west coast of N.
America. Nothing was very recent nor could I find any of these folks. So I did the same, I
relied on the web. I think the choice of boat is very
personal and really depends upon how, where and with
how many others you plan to use it. I use to have a
19 foot kayak Pygmy Queen Charlotte
(www.pygmyboats.com) so I had an idea of what it would
be like to sail a T21 - too small for my purposes. I ended up ordering 2 sets of
study plans Pahi 31 and Tiki 26. I still have those
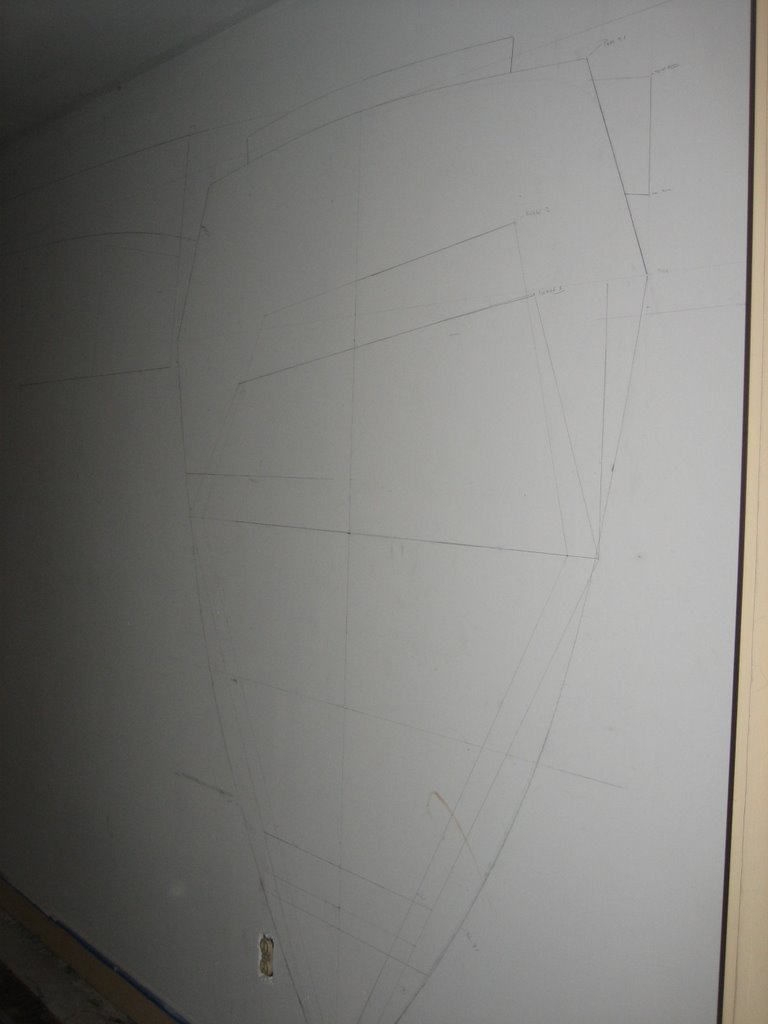
plans taped to the wall beside my bed (I'm lucky to
have a tolerant wife) and I drew full size mid-hull
cross sections of both boats on a wall in the house.
I've spent many days staring at these and contemplating
which way to go. For awhile I thought of buying a P31 for sale in Germany.
Then the T38 for sale in the
Philippines caught my eye. In the end my decision was
based on my love of kayaking and sailing - I wanted
something that moved fast but had me close to the
water. I also didn't want to have a great huge amount of money wrapped up in a boat so I'd be worrying about that. A trip I took in a 13 foot inflatable two
summers ago made me realize what kind of sailing I wanted to do.
The trip was a 900 nautical mile circumnavigation of Vancouver
Island.
I have sailed around Vancouver Is. Several times but to be
able to go into all the nooks and crannys that I
didn't dare approach in my keel boat, my Westsail 28,
was amazing. So what I ended up wanting was a boat I
could beach, something I could sleep inside of if it
was foul, just enough room to sit up but no more (the
Pahi like Wharram comment responds to some peoples need for a regular boat
with sinks, built in stove and a head). I wanted it to feel like I
was kayak mountaineering, not yachting. I also wanted it to be small
enough (think cost to build) that I could leave it in
a remote anchorage to go mountaineering and the likes
and not worry about it. I never looked at the T30 much so
I can't speak to that. Except it looks more time consuming to build weighs 750 pounds more empty and takes 100 square feet more sail. For 2 more inches of head room over the bunks and 3" of additional hull width. Also in the USA customs charges boats over 28 feet for clearance but not below that length.
All I see you get is skinny
double bunks and a little more head room. I think
your dilemma is a common one, others have written to me
about the same thing. One other factor on my part was
I didn't want building to take forever as I want to go sailing not go on building. It had to take under a year.
I've built small boats before and I knew from those
experiences that it takes for ever to do. I've also
seen too many self-built boat projects fizzle out. All
this aside, my backyard really is only big enough for a
26 foot boat!

I think you should think hard about exactly how you
plan on using your boat. I'm 6 feet tall and about
160 pounds on a heavy day. When I first lofted up the
hull cross section of the T26 on the wall I thought it
might be a little tight in the bunks. Now that I've
had a chance to lie in them, even the smaller stern
bunks are big enough.

Good luck with your decision and stay in touch. I'm
interested in others building experiences and how my
blog is affecting their decisions helping them on
their way.

Cheers,
Thomas

FYI: my old profile picture was of me in my Queen Charlotte 19 is posted here again for human size comparison. It was long for a single kayak. To give you an idea of how much stuff you can pack in a boat like a Tiki 21 or 26 if you like the camping idea, I was able to haul six plus week food and gear in my QC 19. It was cold rainy weather most of the time so I ate a great deal to keep going. My feeling is if you are worried that the T26 can't carry all your stuff, think again.
I switched out my profile picture to one of me ripping it up on my tele boards as it's starting to snow so I have skiing on the brain.

Saturday, November 11, 2006


Apparently I am in search of the perfect fillet tool. Beyond the normal plastic scraper that epoxy sellers carry - good but after several uses get rough and don't give you perfectly smooth fillets without additional reworking, I have tried a racketball ball- works well to shape but not spread and hard to hold and a sculptor's rubber shaping tool - excellent but asymmetrical shape needs to be kept in mind. My latest acquisition, a silicone basting spoon - perfect curve, symmetrical, flexible, concave and convex surfaces and spoon shape for excess fillet epoxy mix holds great promise. I sawed off the handle today but did not get a chance to use it. Perhaps tomorrow and if not tomorrow then certainly Monday! Will I find my own personal fillet nirvana? I will report back!


A couple of days ago I posted about my water tank below the footwell dilemma. Solved! I'm staying on the fence. I increased the width of the foot well board, added a screw in deck hatch and will add a brass or nylon hose barb adapter at the low end so I can put a 1/4" hose with a hydration bladder style bite valve on it and presto I have a storage area or a water tank. No pipe required. The hull sides will be the tank. Really what I didn't want to do was create an enclosed space with no access. I found the access at a local chandlery for 6 bucks.

Speaking of hardware, screws, bolts and the like, none of this stuff will be permanently installed until all cut outs, bolt holes etc are pre-sealed with epoxy. I plan to bolt everything too, as long as I can get to the backside as I prefer bolts to screws. A professor of mine, Andy Vanags, who taught me material sciences once told me of a sailor whose boat was screwed where it should have been bolted. This sailor was making a major deep sea crossing when he noticed fasteners in his boat were stripping out. They were screws and there was little he could do to tighten them. His boat was literally falling apart on him as he sailed on. The lesson - bolt where you can so you can crank them down when necessary.

For the first time I get to really occupy the space created by the sheets of plywood that make up the volume of this first hull of this Tiki 26. As I sat there, I could here the sound of water rushing past the hull. It feels great the way tsunamichaser surges with the swell diving downwards to meet the rising trough before rising to the next swell. Yes this is why I am building this boat.

Friday, November 10, 2006


Here are some of the images from the youtube slide show


I'm using youtube to make a slideshow of my sequence to cutting out the hole for the door button I'm using as a bunk latch. Hope it is helpful.
I just measured the internal volume of the boat below the bunk boards. This does not include the area in the stern or the two forward most compartments, only the area in the cabin. I used V=.5bxhxl and came up with b and h by measuring the mid point values for each space. Excluding the foot well, it turns out to be 346 liters per hull. This equates to 16 medium size dry bags or 5 large (read expedition) back packs per hull or a total of 10 back packs or 32 dry bags. This is a lot of stuff. Between the two hulls, if all this was water it would max out the amount of weight Wharram suggests you can load in a Tiki 26. If you use a factor of .4 (taken from volume of the big backpack and the suggested carrying load weight) then this below bunk area is where you would store 40% of what you bring on a trip. But this should be modified as presumably you won't have a tent and light things like clothes, sleeping bag and pad would go above the bunk boards so perhaps the area below the boards will carry more like 60% of your stuff by weight. All these issues are important when it comes to thinking about the intended expedition.....
I woke up this morning thinking about my water tank idea. If I'm going to do it, now is the time. It's pretty simple and it uses very little space that isn't already wasted. It is in the area at the bottom of the V at the footwell and perhaps a couple of feet on the other side of the bulk head forward to this. It will be made of 4" pipe. Each foot of length translates into 1/2 gallon of water. Between the two hulls, it will amount to five gallons of water.

Thursday, November 09, 2006


Today was an epoxy day. I glued, I filleted, I coated and I taped. I am almost done with the required work below the bunk level. It has taken longer than I expected. Instead of feeling frustrated by this, I am enjoying the tasks and the speed of the work. I really like the way you build the Tiki 26 - upwards. To me it feels like you are slowly filling a bucket with water. There is a great deal of satisfaction to this.

The pictures I'm including today are of areas where I've added things. This includes two areas, at the forward bunk and below the hatch. Both include partial bulkheads up to the bottom of the bunk boards. The bunk ledgers I've added feel like they add to the tetrahedron concept. The battery box has holes for a retaining strap and a large cut out so you can get to the area below the bottom. I had a small problem with the board for the bottom of the box this morning, it was wet on one end. I thought of different ways to dry it and finally decided to wrap it in a towel and put it in the dryer with a handful of other towels. It worked perfectly! After about half an hour it was dry again. Tomorrow I will pull the last wires, give the two areas needing their final coat of epoxy and the be ready to install the bunk boards, after I finish them of course. Perhaps I might get to the upper sides next week. But then again maybe filling the bucket with water may take longer.

Wednesday, November 08, 2006


After thinking that I was going to install a square latch type catch to hold the bunk board hatch in place, I chose to go with the round one shown. It's simpler and will work well. Flush installation was a snap. I'll do a post showing the sequence next time I work on this. I am through bolting them so they won't pull out. I do still need to figure out a lift but I think I'll use a short loop of line installed under the butt plate on the hatch.


It came to me this morning - how and where to fit the batteries. It uses up a little more space than I'd like but it's a good solution. They go right behind the forward bulkhead to the cabin and it can fit 1 group 27 battery or up to 3 group UL1 the ones used in golfcarts and wheelchairs. Sometimes you just need to stop thinking and let your subconscious take over!


I dry fit the aft most bunk board this morning. I'm very happy with how it turned out. In the detail you can see the fixed latch. I'm now going to use a different type of latch at the other end, a Sea Dog Door Button. Half the cost and simpler.

A few posts back, I was talking about auxillary power and where to mount it. I've come up with some new ideas. First Scott Williams alerted me to Nissan's 6 hp outboard with built-in alternator for battery charging. It looks good but I still don't want to deal with gasoline. This morning I found a 5.5 hp diesel engine by Robin/Subaru. http://www2.northerntool.com/product/358_358.htm This is an affordable engine, us$850.00. It's small and pretty light - 65 lbs dry. So the new problem to tackle will be how to mount it and how to hook it up to an alternator (belt drive likely) and a propulsion system - hydraulic impellor drive, diesel electric, direct drive Thai longshaft boat style. Anyone out there with any good ideas? Any mechanical engineers? ........
Technical fact - It was pointed out to me by a chemical engineer that an epoxy boat might not fair well in the cooler temperartures of the Arctic. I checked with the chemists at SystemThree Epoxy. Silvertip maintains its strength to -50 F with a safe working temperature of -30 F. It becomes brittle beyond -50 but only while the temperature is that cold. My plan for Arctic exploration in my Tiki does not call for use during the winter months.

Adventure! This boat building process is turning into exactly that. Like the ridge in the photograph, building a boat is a long thin line. Each step equally important. How you take each step and what you bring with you will influence if not outright determine the outcome. In mountaineering, you need to focus on each step as it could be your last if you become sloppy. In boatbuilding, you will live with the short cuts and inattention you had along the way until you step ashoe for the last time. You need to have the whole picture firmly in your mind at all times. Success comes from envisioning the whole lengthy process in your imagination; what you will need along the way, where you will rest, what reserves do you have to keep you going and what milestones will you set for yourself so you don't loose perspective. Under duress will you stick to them, retreat when you said you would so you can live another day to go on or will you loose all insight and plod on into oblivion. The risks associated with each activity, mountaineering and boatbuilding are not the same but the rewards are as are the steps you will need to take along the way. To succeed you need vision and purpose. The ridge (of an undisclosed mountain because it remains unclimbed) in the photo is one that my friend Paul and I have talked about tackling for years (he gets the photo credit). On a Bluebird day, as in the photograph, the ridge is majestic and very intimidating. Imagine it in a full on storm with night approaching! Under such conditions it would be absolutely terrifying; having knowledge of the mountain, the stamina to plod on one step at a time while maintaining the big picture and a good aerial photograph will help you on your way. They won't make it much easier but they might help you stay focused. Building a boat that you can see a photo of and you can envision through the designer's plans is helpful as it keeps you goal focused. The path is not easy though. It is the little things that start to erode your vision. If you set out on this boatbuilding adventure, don't rush in the beginning. Every piece of work you put into the boat, be it well or poorly executed, will live on in the boat. Think of that and then envision all the conditions the sea and its bottom can throw at you. Don't think of this as a battle but as an opportunity to harmonize with the sea. I think what appeals to sailors, who become boatbuilders, is the knowledge of how the boat was built. By building it yourself you are part of it. Very differnet from a boat assembled by someone who will not be associated with its use. They won't be out there with you when it gets rough but their care or lack there of in building will be. That said, the sailor's skills as boatbuilder may not be the best but at least you know where the weaknesses are and hence the limitations. If you work carefully and consistently, you will know the boat's strengths and weaknesses. That said do not rush at first to get the work rolling along, plod carefully up the long steep ridge while envisioning how you will get back down too.

Tuesday, November 07, 2006


After I made all the hatch components, I dry fitted the pieces. I am using 15 mm plywood for the catch, latch and latch plate doublers and 6 mm plywood for the lip. The doublers are 2 3/4' X 4". On the plywood catch, I used a beltsander to sand a bevel on the backside of the plate. The bevel is 2" long and two plys thick. This cants the catch just enough that it won't bind. It is glued to the backside of the hatch with one inch protruding. The other doublers are mounted flush with their edges. The lip for the hatch is made of 1 1/2" strips of plywood scrap. They are fitted with tight butt joints which takes some doing as you need to get the angles and spacing right at the same time. To simplify aligning them with the edge of the hatch opening, I minimally kerfed (so a kerf is just visible - maybe 1/64") the strips so that I can align them with 3/8" exposed.

Once everything had been dryfitted and the lip components had gaps cut in them for the doublers and were temporarily taped together, I mixed up a batch of SystemThree Silvertip Gelmagic, put it in a ziplock bag and squeezed it out on the glue surfaces and fitted the pieces. I took the opportunity to fit the bunk ledgers at the same time. I like using wire to hold these pieces in place instead of screws as you can adjust the alignment. All the wire holes will be filled before I put cloth on the outside of the boat. I also gave the storage area under the bunk a final coat of epoxy which I brushed on, squeegee'd out and then backrolled. My plan is to only paint the inside of the boat from the bunk boards up, leaving the bilge clear coated.


The sequence of photos is of cutting out the components for an inset hatch. This is not a simple process and definitely adds time to the project. Each hull will have four of these. I cut the straight edges of the opening with a panel saw and then finished up the corners with a jigsaw. You need to work carefully as you need both sides of the cut. Once they are cut out I use a laminate trimmer with a quarter round bit to rond off the edges. Working this way will give you a hatch without wasting material as you use the cutout for the hatch and scraps to make the doublers and the hatch resting lip. You need to make doublers for the catch, the latch and the latch receiver. Once assembled you will have a locking hatch.

Wharrams hatches will do fine. They are simple to build. What I don't like is that you miss the opportunity to make each bunk board a continuous web in each hull section that provides additional horizontal stiffness to the hull.


My good buddy David Porter came by for a visit to look at the boat. We had a good yarn about boatbuilding and about the Tiki in particular. David is a naval architect who lives and practices (he's getting pretty good after fifteen or so years!) on the "Rock" also known as Newfoundland. It happened he was out in Victoria so he dropped down. He didn't stay long enough for me to put him to work but we did manage to stay up late drinking beer and talking boats. I think he's a convert, he kept asking when we were going sailing!

Monday, November 06, 2006


For those of you who noted my blogging absence for a couple of days, I was away in the Gulf Islands. Not that I wasn't busy! I spent most of rainy Saturday playing around on paper with a new cockpit design. My idea is to secure a permanent straight flange to the inner side of each hull between where the mast and aft beam fit. To this flange will bolt seat boxes. Between the seat boxes at cockpit floor level I will bridge the seat boxes with a trampoline. This way the boat won't experience the slamming some owners note and as is common in cats with a bridge deck. Issues to be resolved - attachments of components and where to stick the auxilliary. Can I get away with a 5 hp outboard and will it fit in a seat box? I'm thinking of the Honda 5 hp as you can get it with an alternator. I have more head scratching to do!

Though it has continued to rain, I got to work this morning as usual. I had to work around the rain which was particularity heavy this morning. So far 28 mm rain today. I am continuing to focus on the bunk boards. I can see that these will take awhile. Last week I epoxy coated both sides with 3 coats each of clear coat. Today I continued the process of shaping and fitting these. I cut them out, fitted them to length. As I had made them a little proud for the space they were to go in by a quarter of an inch so in all, I ended up cutting about half an inch off in length. After cutting them out and getting the length right, I planed the edges so they are a true curve and then beveled the underside, with a planner, to a 45 degree angle. I sanded the faces smooth with 120 grit paper on a random orbital sander and then laid out what I believe is how I want the hatches to be. Mostly I anticipate items in drybags to go under the bunks but I want a place for a small tool box that includes tools and spares and I need to determine exactly where the batteries will go. This raised all sorts of questions. What size tool box? What kind of batteries. Group 27 batteries are common marine batteries but are awkward to move at best so I am leaning towards the smaller batteries used in wheelchairs, golfcarts and to start smaller electric outboards. This may end up costing more but I want to conserve space and I don't want to have to be dragging large batteries in and out of the boat while on my stomach. What will the batteries be for? Mainly the navigation lights, an inverter and maybe a bilge pump though I don't plan on having limber holes between bulkheads so a hand pump will be more useful. For equipment such as the GPS, I'm planning on using NiCads that charge off of a solar panel.

Back to the bunk board work at hand. I plan on using a latching catch to lock the bunk boards down. Such latches, in marine grade go for as much as US$ 45 on line. I found them for $11.55 at my local hardware store, Hardwicks. It's a crazy place, they'll keep an old price until all the stock is sold then change the price when they order more if their cost goes up. They happened to have a box of latches that had been around for awhile so I scored. Wholesale today isn't even that low and yes I checked that these latches were intended for marine use - ABYC ok'd.

What I'm up against this week, other than figuring out where and how big I want the bunk hatches to be is installing bunk beams along the hull sides, cutting out the hatches, fitting hatch ledges and a retainer and doubling plate for the latch on the hatch.

Friday, November 03, 2006


Not much work going on today. All I did was the final coat of epoxy to the bunkboards. This way I can cut them out and start fitting them on Monday. It's been raining like crazy all night and day. This morning the hygrometer was showing HH, it's way of saying drenched! The weather looks warmer next week but not much dryer.

I took a look around the house and in my cupboards and realized that I had neglected other things I needed to do like cleaning up and buying groceries. Done! I also had a consulting gig I needed to attend to this morning. It ended up swallowing the morning but that is good for the coffers.

It looks like my blog is getting some attention. Since I started posting in the end of September over one thousand of you have visited the site and viewed three thousand pages. Thanks for your interest and your comments

Thursday, November 02, 2006


Today was a random activity day. I put the second coat of three of epoxy on the backside of the bunk panels. As the photo shows my "clever way of making an underside fillet for the bunkboards turned out to be too small and failed to release from the form properly. I used oil as my release agent. I think I'll try PAM or vaseline. Any suggestions? Good thing I didn't do the real thing. At least I learned that lesson from my molding clay debacle. So since I couldn't do the work I had planned to do I did random things. I glued on the bow and stern cheek panels for where the upper hull panels land and I glued in the last diagonals. I think I've given up on doing built in water tanks. Flexi-space like Wharram calls it. KISS is the way to go. Built in tanks would hold little water and be a pain to keep clean. More on these later, perhaps I haven't totally given up on them. ..Oh I had a friend over for lunch so we talked boats, always good but I got little done.

Wednesday, November 01, 2006

Consequent of my sticking my arm into fresh epoxy (I did have a long sleeve shirt on but it soaked through) and the comment to my earlier post, I'm posting a couple of safety links. One by Sam Devlin, a Pacific Northwest boatbuilder and one from the manufacturer of the epoxy I'm using, SystemThree.

http://www.masepoxies.com/safety.htm

http://www.systemthree.com/index_2.asp - you will need to become a member (free) to access their Epoxy Book which has a lot of great information and this is great epoxy.

I've used it for twenty years and it has never failed me. One of the toughest project, where I used SystemThree, was the pictured ultra thin/light weight outrigger paddle I built. The reinforcing on the blade is a scrap of cloth my wife found while trekking in Mali.


I glued in the diagonal/partial bulkhead set in the wet well section today. This is where I've turned the diagonals the opposite direction from what the plans show and added a bulkhead to create a split storage area, Wet and dry. My plan is to create the floor in this area by gluing in a section of 4" pipe,preferable the polypropylene type that is considered safe for drinking water. Hopefully my plan will work.


Work on the boat seems to have slowed in pace. No big dramatic steps forward like wiring panels together and suddenly you can envision the boat. Today I made my first couple of mistakes too. I had just spread out a big batch of epoxy and then proceeded to stick my arm in it. Luckily I coat myself in barrier cream up to my elbows! Next I tackled the removal of the molding clay barriers that I had made to facilitate making end fillets for the diagonals only to discover the clay was binding with the epoxy. Good lesson as I was about to start making underside fillets for the bunk boards. I stopped before I started pouring epoxy and made a test jig. I am using base molding as a mold to form up the fillet. The photos show one mold in place and the test sample I made to see if the base mould material releases - it's some nasty kind of plastic that smells of styrene. People put this stuff in their houses?!
Having work slow down hasn't been all bad. I can do other things in between. On Monday I stood outside staring up at the blue sky trying to locate the honking sound I was hearing, there were four snow geese flying overhead. They were pretty high up and flying in pairs. It was great to watch.
  • CLICK HERE TO SHUFFLE MY PHOTOS

    Spot Track

  • Track Tsunamichaser
  • Spot Track
    Click link above the Spot to see where Tsunamichaser is.